The server basics - AWS EC2
tl;dr A quick guide on how to setup an AWS EC2 instance (server) and connect to it via ssh using PuTTY on Windows.
This is a quick post on the key steps needed to setup a internet accessible server (computer) running on the Amazon Web Services (AWS) cloud, which we’ll later use to run dedicated applications on. We’ll also access and configure this server through the secure shell (ssh) protocol.
To begin with, login or sign-up for an AWS account. For our purposes we’re making use of the AWS free-tier content.
Choose a region to run our server from in the AWS console. I’ve chosen Sydney as I’m based in Australia, but the choice is really yours.

Now begin the process of setting up the server. In AWS this is known as an instance on their Elastic Cloud Compute (EC2) platform. This can be accessed through the console in the compute section. Then select the ‘launch instance’ button.

We need an operating system to run on the instance. I’ve chosen Ubuntu Linux long term support (LTS) instance as I’m familiar with Ubuntu and (at time of writing) LTS releases continue receiving updates for 5 years. This makes Ubuntu LTS an excellent choice for servers that aren’t going to be replaced frequently.
There are a wide variety of instance types available, but only the t2.micro is eligible for free tier usage, so that makes a good first choice. Then select ‘Next: Configure instance details’

In general when EC2 instances can be relatively easily ‘terminated’ or fully deleted. Selecting the ‘protect against accidental termination’ option is a good idea for an instance you want to run anything important on, such as a website.
Then select ‘Next: Add storage’.
This is the storage that will be available to the instance for any data and software. The default option should be fine (8GiB, General purpose SSD).
Then select ‘Next: Add tags’.
Tags are used to associate characteristics to AWS resources for categorisation purposes. A good first tag pair is ‘Name, Web Server’.
Then select: ‘Next: Configure security group’.
Some powerful permissions can be enabled or restricted here so are worth reviewing. the three main types to configure are: SSH this is needed for configuring the instance via the command line and worth enabling, but restricting to your own computer (My IP) is a good idea (without this anyone on the internet could try and login to your instance and make destructive changes). HTTP this is needed for a website to display anything to the internet, allow from anywhere makes sense here. HTTPS this is needed for enabling encrypted (SSL/TLS) traffic to the website and generating certificates.

(sidenote: I initially didn’t enable HTTPS traffic and took more time than I’m prepared to admit struggling to get security certificates from Let’s Encrypt via Certbot working).
Then select ‘Next: Review and launch’
Check for any obvious mistakes.
Then select ‘Launch’

The best method to access and configure your instance when it’s up and running is via command line interface (CLI) with a security key. Either use an existing key or create a new one. If making a new key, give it a name and download it to a safe place as we can’t create this key again.
Once everything is sorted, select ‘Launch Instance’. The instance begin configuring itself which may take a few moments/minutes.
For access to the instance from a Windows machine a good tool is PuTTY. For Linux and Mac machines the built-in terminal is a suitable tool.
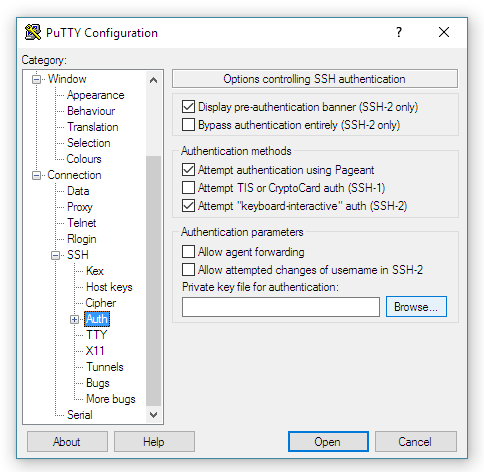
Note: for Windows machines only, to use the private key we created before in PuTTY we need to convert it from .pem format to .ppk format. This can be done in the ‘PuTTYgen’ program by opening the .pem key and choosing to save it as a .ppk key. Once converted we just need to tell PuTTY where to find it for future use (Connection - SSH - Auth - Browse)
Once the instance has fully configured and launched we can find the public IP address (what we need to connect to the instance) on the instance summary page (known as IPv4 Public IP).
We can now connect to the instance through PuTTY, using a hostname of: ubuntu@PublicIPAdress and port of: 22
If everything went well you be presented with a command line running on the instance. A simple test command is: date, which should give the current date/time in coordinated universal time (UTC).